Automatic · Intelligent · Gain Staging
Sweet
Spot
The automatic gain-staging plugin. Sweet Spot listens to a track for a few seconds and puts it in the sweet spot for analog gear: right where consoles, tape machines and analog-modeled plugins are designed to be driven. Then it stays out of the way.
- Press Learn → play → press Stop. The track is gain-staged.
- Or stage your whole session in one pass with Learn All.
- Clean, static gain only. No compression, no coloration, zero latency.
- Not a mix-balance tool: it sets up your session so your faders start at unity, where they're most precise.
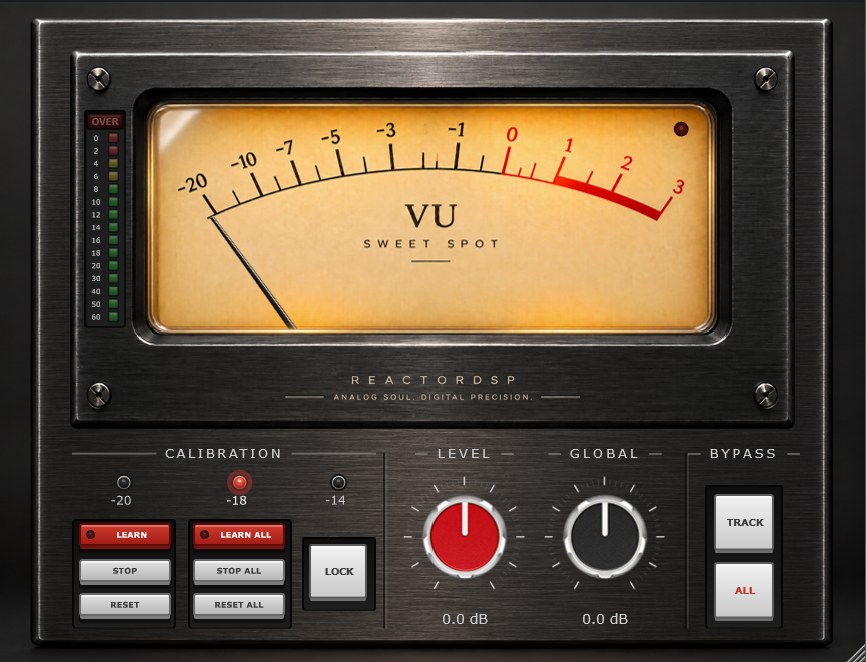
An automatic input trim for the first insert slot of every channel. It replaces clip-gaining each file by hand while watching a meter.
Listens to each track while you play, then sets one fixed gain that puts it in the sweet spot for analog gear: up if it's too quiet, down if it's too hot.
Not a mix-balance plugin, compressor, limiter, auto-rider or loudness maximizer. After Learn, the gain never moves. Your balance, dynamics and performance stay yours.
See It In Action
Colorful Tones Studio
The Problem It Solves
Analog gear and the plugins that model it react to how hard you drive them. Your recordings all arrive at different levels.
Consoles, tape machines, preamps and their plugin emulations were designed around one operating level: 0 VU, which is about -18 dBFS in your DAW. Their saturation, compression and headroom all depend on it.
But a kick mic may come in near full scale while a room mic sits 20 dB lower. Feed a console plugin too hot and it distorts in ways you didn't choose. Feed it too cold and it barely does anything. Every channel strip behaves differently, and you end up fighting input levels instead of mixing.
Sweet Spot fixes that. Too quiet? It turns the track up. Too hot? It turns it down. Every track lands in the sweet spot for analog gear, so the processing after it behaves the way its designers intended.
Before
Levels are random: some tracks slam the console plugin, others barely reach it.
After Learn
Every track lands in the sweet spot for the gear after it.
Green line = 0 VU (-18 dBFS) · loudest VU reading in dBFS · example values for illustration
Where It Goes
First insert slot on every channel, before your console, tape, preamp or saturation plugins.
Not a Mix-Balance Plugin. A Better Starting Point for One.
Sweet Spot doesn't mix for you and doesn't decide how loud the vocal sits against the guitars. That's your job. What it does is set up your session so that job is easier.
Your faders start at unity, where they're most precise
Faders aren't linear. Near 0 dB (unity), a long move changes the level by only a few dB, so you can make fine, accurate moves. Toward the bottom, the same move covers far more, and a tiny nudge becomes a big jump.
Without gain staging, a quiet track forces its fader way up and a hot track forces it way down, into the coarse part of the travel. Every balance move and every automation pass gets harder.
After Sweet Spot, every track already arrives at a sensible level, so your faders begin at or near unity. You start balancing from the zone with the most resolution, and your automation stays smooth and easy to read.
Sets the input level of every track for your processing, and puts your faders at their best starting position.
The mix: balance, automation, and how loud every part sits against the others.
Long travel, small dB steps. After Sweet Spot, your faders start here.
Short travel, big dB jumps. Where badly staged tracks push your faders.
Typical DAW fader scale, for illustration. Exact markings vary by DAW.
How To Use It: One Track in Under a Minute
This is the whole workflow. There is nothing else to set up.
Insert Sweet Spot first on the track
Put it in the first insert slot, before any console or tape plugin.
Pick a Calibration level
Click -18 unless your gear is aligned differently. This setting applies to every Sweet Spot in the session.
Press Learn
Sweet Spot starts listening. The track's gain is frozen while it listens.
You'll see: the Learn light pulses amber and the button reads LEARNING.Play the loudest typical part
At least one second, ideally a chorus or the busiest section. Longer is better; whole songs are fine.
Press Stop
Sweet Spot calculates the gain and glides the Level knob to it, with no clicks.
You'll see: the Level knob moves, the light turns green and the button briefly reads LEARNED.Play back
The track is now in the sweet spot. Done. Turn Level by hand anytime if you want it a touch hotter or cooler.
Every Control, Explained
Ten things on the panel. Here's what each one does.
1
2
3
4
5
6
7
8
9
10
- 1Peak meter. Output sample peak in dBFS, with peak hold and an OVER lamp at 0 dBFS.
- 2VU meter. Output level with classic ~300 ms ballistics. 0 VU = your Calibration level.
- 3Branding. Click to open the About window (version, licence owner).
- 4Calibration. -20, -18 or -14 dBFS. Your console reference (0 VU), which Learn stages every track against. Session-wide.
- 5Learn · Stop · Reset. Stage this track. Reset returns it to 0 dB.
- 6Learn All · Stop All · Reset All. The same, for every Sweet Spot in the session at once.
- 7Lock. Keeps this track out of Learn All / Reset All. Tracks lock themselves after Learn All.
- 8Level. This track's gain, set by Learn (±24 dB). Turn it to fine-tune by ear.
- 9Global. Offsets every track in the session by the same amount (±12 dB).
- 10Bypass. Track bypasses this instance; All bypasses every instance for a quick before/after.
The Intelligent Part: How Learn Decides
A plain level meter can't gain-stage a mix. A sustained bass and a sparse snare can read the same on a meter and still hit the next stage completely differently. Sweet Spot listens to both the body and the peaks of each track, so every source gets the gain that's right for it. Tuned by ear against a real analog console.
Bass, guitars, pads, vocals
Dense sources are set by their body, so they drive the gear the way it's designed to be driven.
Snare, percussion, plucked instruments
Spiky sources are set by their peaks, so their transients don't slam the next stage. They read lower on the VU. That's intended.
Built-in safeguards
Needs at least 1 second of audio. A shorter pass leaves the track unchanged.
If nothing peaks above -20 dBFS, the track is skipped. A tom mic that only heard bleed won't be boosted.
Learn never sets a gain that would push the measured peak above -1 dBFS.
The learned gain is limited to ±24 dB.
The gain doesn't move during the pass, so the measurement is never affected by its own result.
Stereo tracks get one gain for both channels, so the image never shifts.
Which Calibration Should I Pick?
Calibration is your console reference: what the VU meter shows as 0 VU, and what Learn stages every track against. Not sure? Use -18.
-20 dBFS More headroom
US / SMPTE-aligned gear. Drives emulations gently and leaves the most room for dynamic material.
-18 dBFS Standard · default
EBU R68. The level most console and tape emulations are designed around. The right choice for most sessions.
-14 dBFS Hot
Hotter-calibrated gear. Pushes emulations harder for more density and color.
Session Workflows
Every Sweet Spot in a session talks to the others. Control all of them from any one instance.
Stage the whole session
Learn All → play the busiest section → Stop All. Each track gets its own gain from its own audio and locks itself. Tracks that were silent during the pass are skipped and stay unlocked.
Re-learn only some tracks
Tom fill only happens in the bridge? Unlock the tom tracks, play the bridge, Learn All / Stop All. Only unlocked tracks learn; Learn All shows how many, e.g. LEARN ALL (3). Alt/Option-click any Lock to unlock everything.
Drive the console harder or softer
Turn Global to push every channel into your console or tape emulation by the same amount, without re-learning. Each track keeps its balance relative to the others. Double-click to return to 0 dB.
Hear before and after
Press All under Bypass on any instance to hear the whole mix without staging, then again to bring it back. Bypass glides the gain, so it never clicks.
Pro Tools multi-mono: linked channels learn together and get the same gain, so the image stays intact.
How It Differs From Other Level Tools
| Sweet Spot | Auto-gain riders | Compressors / limiters | Manual clip gain | |
|---|---|---|---|---|
| When it measures | Once, when you press Learn | Constantly | Constantly | You watch a meter |
| Gain moves during playback | Never | Yes | Yes | Never |
| Changes your dynamics | No | Yes | Yes | No |
| Accounts for peaks and average | Yes, automatically | Varies | n/a | If you know how |
| Whole session at once | Learn All | Per track | Per track | Per file, by hand |
Specifications
| Calibration | -20, -18 (default), -14 dBFS; session-wide |
| Level | -24 to +24 dB per track |
| Global | -12 to +12 dB, added to every track |
| Minimum listen time | 1 second |
| Silence / bleed gate | Track skipped if its peak stays below -20 dBFS |
| Clip protection | Learned peak never set above -1 dBFS |
| Gain changes | Smoothed, click-free; stereo channels share one gain |
| VU meter | Output, ~300 ms integration; 0 VU = Calibration level |
| Peak meter | Output sample peak, 0 to -60 dBFS, 2 s peak hold, OVER at 0 dBFS |
| Latency | 0 samples |
| Channels | Mono, stereo; Pro Tools multi-mono linked |
| Window | Resizable, 60% to 200% |
System Requirements
Windows
- Windows 10 or 11 (64-bit)
- VST3 / AAX compatible host
macOS
- macOS 10.14 Mojave or later
- Apple Silicon or Intel (Universal)
- VST3 / AU / AAX compatible host
Internet needed once to activate your license.
Get Sweet Spot
One license. Three machines. All plugin formats. Lifetime updates.
$39.99
One-time purchase
- VST3 / AU / AAX
- Windows & macOS
- Learn All, Lock & Global
- Full user manual included
- 3 Activations
- Free Updates